
Spring Flower Centerpiece
For the professional floral designer the first flowers of spring following Valentine's Day are such a joy. In this flower school how-to video demonstration Leanne creates a beautiful monochromatic, foam free centerpiece. Beginning with a base of hydrangea Leanne adds hellebores, hyacinth, miniature callas, garden roses, ranunculus and branches of flowering plum. The finished design is a fragrant celebration of spring flowers. Enjoy!

Video Transcription
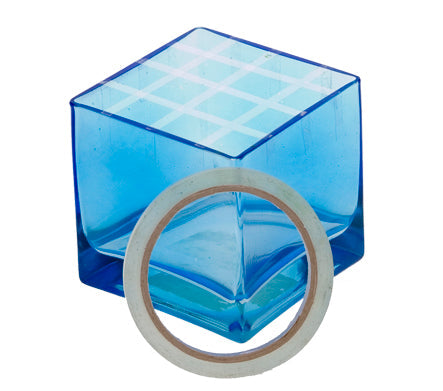
Welcome to the Flower School .com Video Library. I'm Leanne Kesler, Director of the Floral Design Institute. And today I'm here to share with you a fabulous spring flower centerpiece. The mechanics, we're going foam-free, which is nice for fragile spring blossoms, using alternative mechanics of the clear waterproof tape. I've built a grid going across. And then again, the trick is when you do this take an extra strip and go all the way around the outer edge. This ensures that it won't come loose. Then just add water premixed with flower food, and you're ready to design.
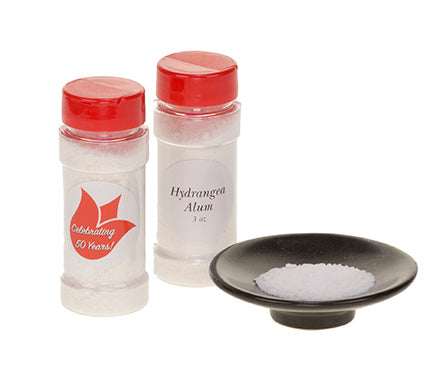
I start with the base layer. Starting to build a nest to support the other blooms. Some gorgeous blush hydrangea. Such a soft peachy hue. Pulling off some of the outer leaves, giving it a cut and then dipping it in alum. Alum is a pickling spice, and it makes it last so much longer. Then setting it right down into the taped grid. Some dusty miller, that soft gray, be stunning. Again, giving it a cut, setting it into the grid and letting it break the line of the container. Then continue placing the hydrangea and the dusty miller, radiating from a central binding point until you have the base covered.
The base is pretty all by itself, but now taking more spring blooms and adding another layer. Can be the delicate hellebore, so soft and pretty. Giving it a cut and then letting it come out a little bit taller. The fragrant hyacinth in a deeper hue of pink. Setting it down in, immediately makes the design. Adds that essence of fragrance that makes it so much more wonderful. Some callas, feeding it in. Then one of my favorites, the garden rose. Keira is the variety. Again, that soft pink hue, picking up the blush and the hydrangea. Ranunculus, sliding it in. You can see, just letting it sit above the hydrangeas and the dusty miller, and then adding more of each bloom till it's full, lush and fabulous.
As a final touch, adding yet another layer. A little bit longer, a little bit leggier, some beautiful flowering plum. It's actually locally grown, locally harvested by a windstorm and an ice storm. It was so fun to be able to just go out and gather branches. Gifts from Mother Nature. And then taking them, placing them in and letting them drape, be a little longer. Cutting them down, pruning out any dead bits, and then sliding it in, finding the perfect little spot. Making sure it gets to down into the water. You don't want it to be drying out. I'm going to turn and adjusting. You can see how it gets its own little character going on. Coming back, a little bit more here. Coming out the opposite side. Turning it, finding a perfect spot to feed it down into the grid. Up and over, turning. Continuing on until it gives you that little bit of dancing playfulness over the top.
With the three layers in place, the base, the main flowers, and then the branches. Then I can turn it and look for holes. Look where maybe it needs just a little bit more. Maybe another of the hyacinth to add a pop of color in the center. Finding the spot that still is available. Maybe it's another of the callas, bringing in the deeper color. Turning, looking, another hellebore. Grouping it over with this one so that it just adds a little more value to this side. Tucking it in deeply and turning. I think I need one more calla right over here. Finding the hole to feed it, there we go. Tucking it in, and then turning it and looking once again, to see where it might need another bloom.
The recipe, focused on monochromatic tints, tones, and shades, all in that pink color harmony. I used three of the hydrangea, that was the starting point, and then a bunch of dusty miller. Then I tucked in six of the hellebores, three of the fragrant hyacinth, seven of the miniature callas, three of the Keira garden roses. They're so grand. Then five ranunculus. And then last, the flowering plum that I gathered here in the neighborhood.
The joy of spring flowers, after a dark cold winter, just warms the heart. Using so many different varieties can make you so happy. You'll find more wonderful spring inspiration on the website, Flower School .com. If you have questions, you can reach us through there or pick up the telephone and give us a call at 503-223-8089. Now it's your turn.
Gather your favorite spring blossoms. Make a beautiful bowl centerpiece. Be sure to take a picture, post it on social media and hashtag Floral Design Institute. That way we all can see what you do as you do something you love.


