
Holiday Flower Rings
All of us at Floral Design Institute are delighted to see that floral jewelry is becoming more and more popular. Floral necklaces, cuffs and rings are seen in weddings, proms and homecomings. But, why not for every festive occasion, or no occasion at all? In this how-to-video Leanne creates a stunning floral ring for holidays. Perfect for a party, dinner out, or a night on the town. Enjoy!

Video Transcription
Welcome to the Flower School .com video library. I'm Leanne Kesler, Director of the Floral Design Institute. And today, I want to share with you a festive flower ring, perfect for holiday parties.
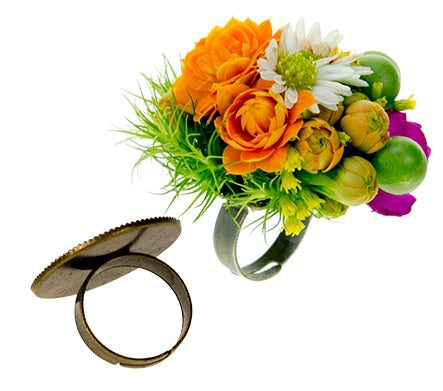
To create the ring, you'll need Oasis Floral Adhesive, cold glue. Then you'll need a ring blank. That way, you can have a perfect base to work on. Then you need little bits. That's really all it is, is little bits. So maybe a hypericum berry, just pull it off, maybe even two. You can think about another one, but I'm going to start with just two for right now. Looking at Pieris, pulling out a few strands. This is something you can just go through the flower shop and pick little pieces. You don't need whole stems of anything. Maybe you can go outside in your yard and gather up some treasures, little bits of succulent, even taking just individual pieces off the plant, plucking it. A little bit of sage, just some small leaves, you don't need a lot. Laying everything out so that it's ready for you before you even begin.
Start by putting a small layer of glue right on the base itself and let that begin to set. That way, as you work, you'll be placing glue to glue, which gives you the strongest bond. Then I start with the larger items. A little bit of glue on the base. Let it set. You want to let it set until it gets just a tiny bit bubbly. When it's bubbly, it's going to have the best bond. So I've got glue on a few of my items. Now, maybe a little bit of the Pieris Then start the assembly, placing it glue to glue, letting it come off the base, so it'll give you a nice bit of movement, a little bit more of the Pieris. Then coming back in with the larger items, keeping the largest centered so that it will balance well as you work. Again, working with that glue to glue so that you get a very solid foundation. Grouping the hypericum berries to bring that color in. Coming back with more of the succulents. Finding the perfect spot to tuck it in, turning it to the right, to the left, until you find where it fits, and then holding it with just a little bit of pressure until it sets.
As you get to the smallest pieces, it can be easier to take your glue and just put it onto a piece of cardboard. That way, as you take your items, you can just dip it then place it, repeat, shortening it to the length that you want so that you get things placed well. Each time, letting it set just a little bit. Then going back, adding in additional materials. A little bit more of the sage, more succulents, with a little bit different texture. The more varieties you can have, the more interesting the finished piece will be. Making sure that you get the glue tucked in low. You don't want any glue to show on top, so it stays nestled down in. Finding places to just slide it in and under. Then determining, do you want to change anything? If something isn't quite right, don't hesitate, pull it back out. Remove it. Maybe shorten it. Adjust the sizing. Re-insert. That's the beauty of the glue, until it truly dries, you can move it and adjust. And then once it's dried and hardened off, it stays perfectly, and you don't have to worry. Then look at your focal area, determine if you want a little bit more color or if you're happy. Double check, do you need another leaf? Then add in until the base is totally covered and there is no spec of glue showing.
As you're finished, go ahead and put the ring on. Look at it from the sides, look at it all the way around. Make sure it feels balanced and comfortable. Then, to enhance the focal area, that emphasis right in the center, taking one last type hypericum berry, a little bit of glue on the base, and then placing it on top of the others, so it adds height and dimension to the ring.
Floral rings are such a festive touch for the holidays. Make one for yourself, make one for a friend, go out and about. You'll be surprised how many comments you get. The recipe is easy. It's just bits of your favorite things, and then the ring blank, and Oasis Floral Adhesive. It's really not a true recipe, because bits are just things you forage. Now it's your turn.
If you want more creative inspiration, check out the website at Flower School .com. If you have questions or if you want to purchase the blanks, you can find them there and reach out to us through the website. Or pick up the telephone and give us a call at (503) 223-8089. Now it's your turn. Get ready. Make yourself a beautiful ring. Take a photo. Post it on social media and tag Floral Design Institute. That way, we all can see what you create as you do something you love.


